A: Yes, you can delete a transaction from a batch by following steps below. Just note that there is not a way to repush this transaction from payables, so if you need to process this transaction again, you will need to re-enter it in BTE.
1. Go to Prism and search for “Process Payroll”

2. Open up your batch and go to Time Sheet

3. In Time Sheet, find employee and click on the employee name.

4. When employee time card is pulled, click on yellow space to get Blue X to pull up. Once Blue X is showing, click on it to delete transaction. You can delete one line item or continue clicking X’s that pop up to delete the rest. When done, click return/save and you will be back in time sheet view. You can do this for another employee or process payroll as normal.
A: You would do this from Prism-Informer Reporting as shown below.
1. In Prism, you type informer on the top

2. When informer opens, you will then search for report names Employee Payroll Voucher. Then select launch

3. You will fill in employee ID and date range and select launch

4. Once report is ran, you can export in top right to excel or PDF

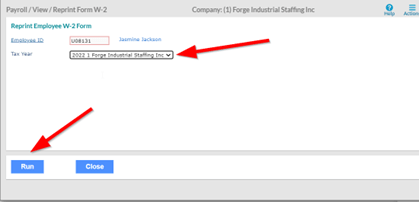
Q: How can I print a W2 for SA?
A: If it is 2021 or prior it will need to be reprinted from Avionte.
If it for 2022 it will be from Prism following below steps.
1.) In prism, look up employee

2.) Once you have employee pulled up, go to actions>reprint form W-2

3.) Select Forge and then run. You will then get your PDF W2

How to add Pay Rate, Bill Rate, and Mark up Percent to the Trans Master Sum v4-Branch report:
Open the report in Canvas for the date range that you want to see, then click Next
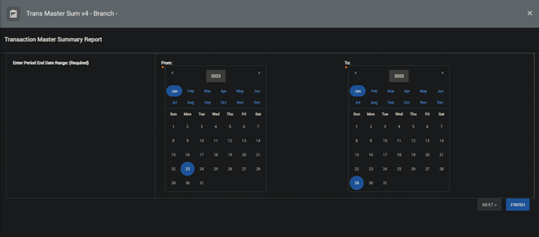
Scroll down on the next page and select your branch, then click Finish

After it loads, download the report in Excel 2007 Data

Open the file after if downloads
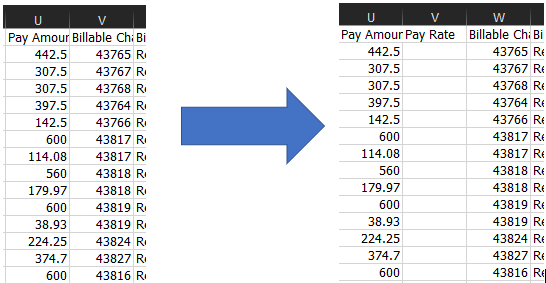
Add a column between column U (labeled Pay Amount) and column V (labeled Billable Charge ID) and label it Pay Rate
In cell V2 enter the following formula: =U2/T2
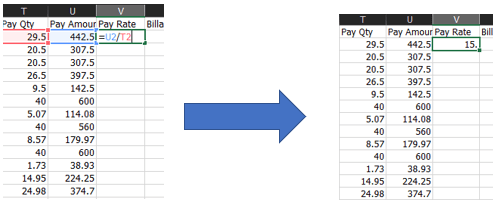
Hold your mouse over the lower righthand corner of the cell and double click so that the formula copies to the bottom of the sheet
Then insert two columns between column AD (labeled Bill Amount) and column AE (labeled Pre Invoice ID). Label your first new column “Bill Rate” and the second column “Mark Up”
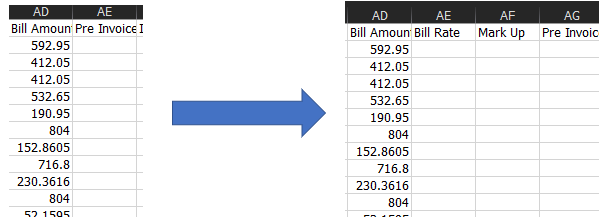
In cell AE2 type in the following formula: =AD2/AC2 then double click the lower righthand corner of the cell to copy the formula all of the way down the sheet
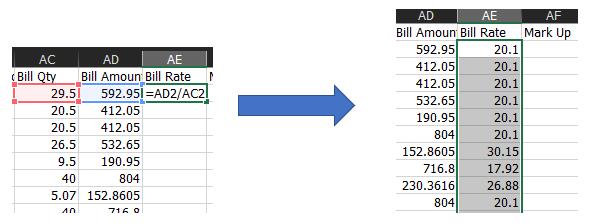
In cell AF2 type in the following formula: =IF(AC2=””,AD2/U2,AE2/V2) then click the lower righthand corner of the cell to copy the formula all of the way down the sheet

How Can Associates Access Their W-2 In Prism?
Direct them to https://forgestaff.com/employee-login/
Click the “Access Employee Portal” button in the blue box
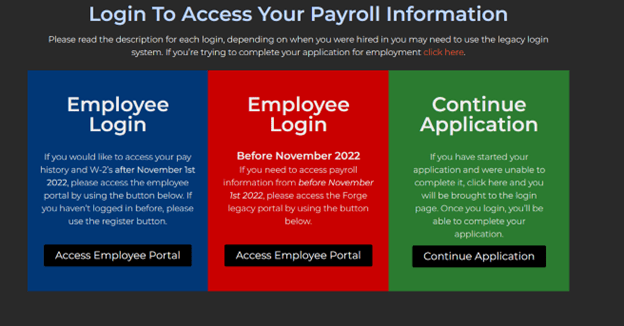
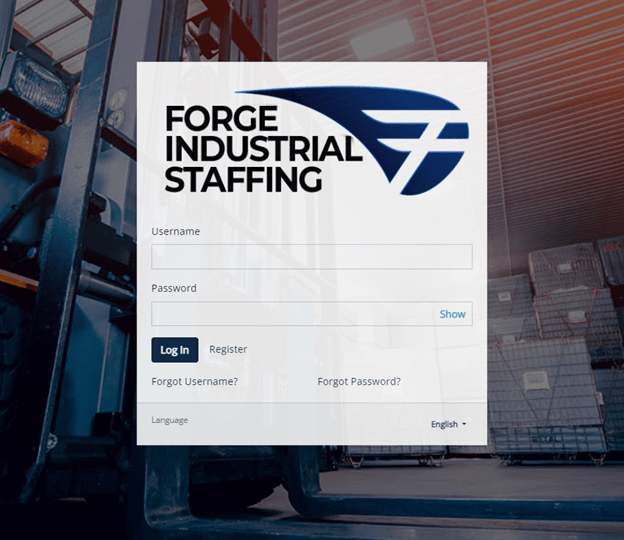
Login using your user name and password. If you have not registered, click the “Register” button.
From the Prism Dashboard, click “Taxes”
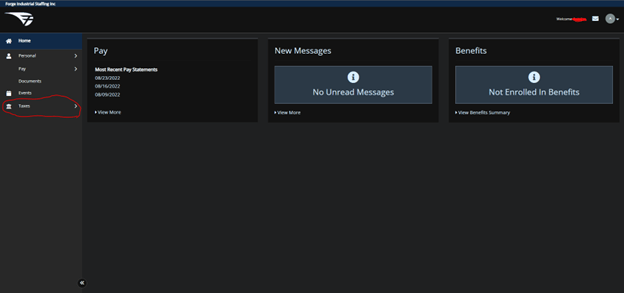
Then Click W-2

From the drop down select which W-2 you would like to download.
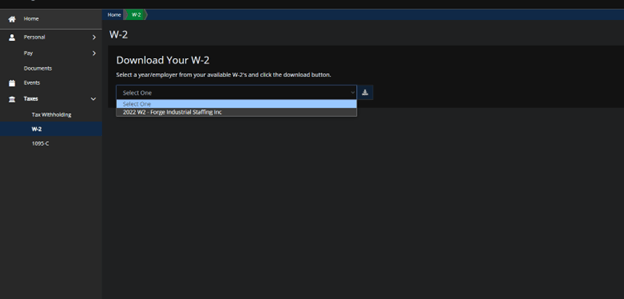
Click the download icon to the right of the drop down.
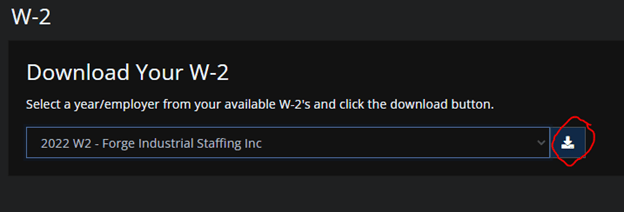
Your W-2 is now downloaded.
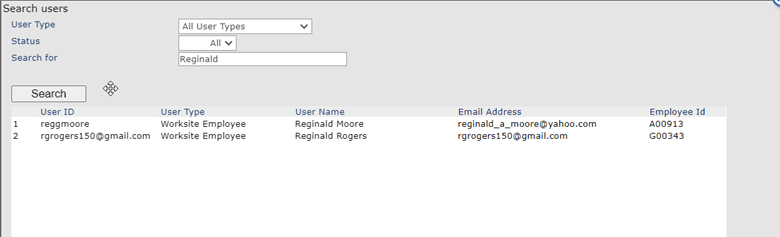
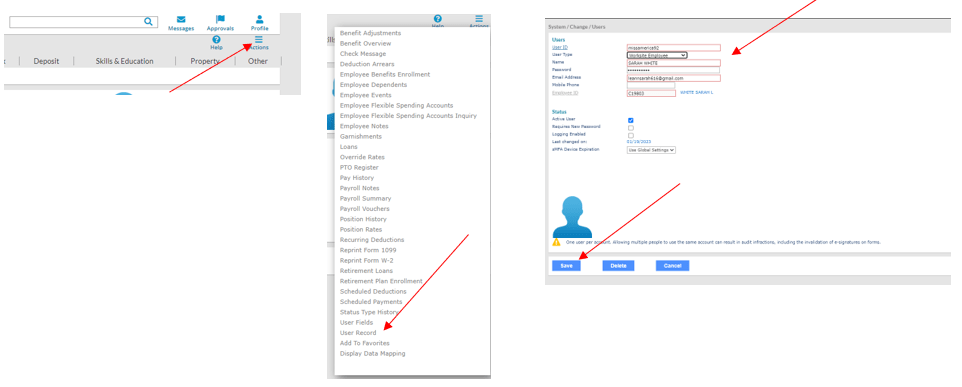
How can I see if an employee has registered on Prism web login?
Below are the steps you would follow in Prism to check.
Go to prism and look up employee, click actions and then user record
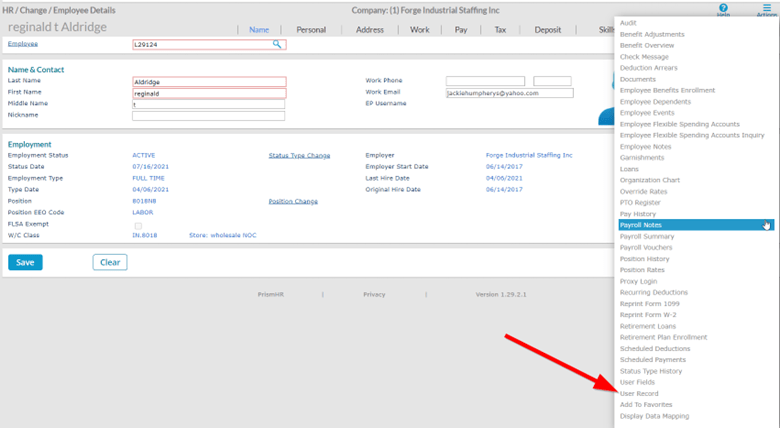
Click User ID
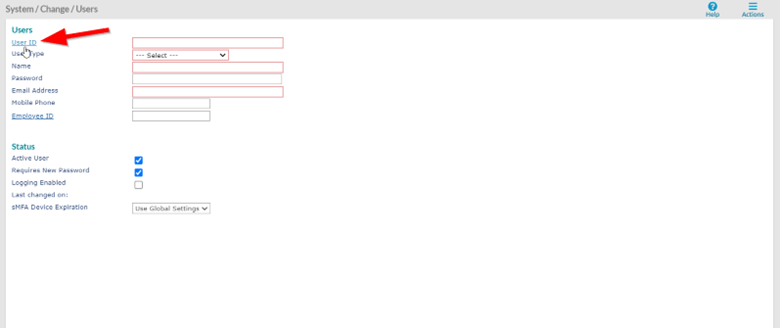
In search for area you can type name or email to see if they are registered. If their name does not show up here, they have not registered to Prism yet
What do I do if an SAs W2 is incorrect? Example: Social incorrect, name incorrect, etc.
A W2c will need to be created for them. To get W2c, you will submit a ticket on IT support form and include information below.
Note: To obtain corrected W2, it can take 2-3 weeks. Please make sure to inform SA of this information.
Employee Name
Prism ID
PDF of incorrect W2 to attach to ticket
Corrected SSN if applicable
Suspected Error
If it is 2021 or prior it will need to be reprinted from Avionte.
If it for 2022 it will be from Prism following below steps.
Once you have employee pulled up, go to actions>reprint form W-2

Select Forge and then run. You will then get your PDF W2
How can I see when a direct deposit was entered or changes were made.
You can view this in Prism with steps below.
Go to employee file, click actions then audit
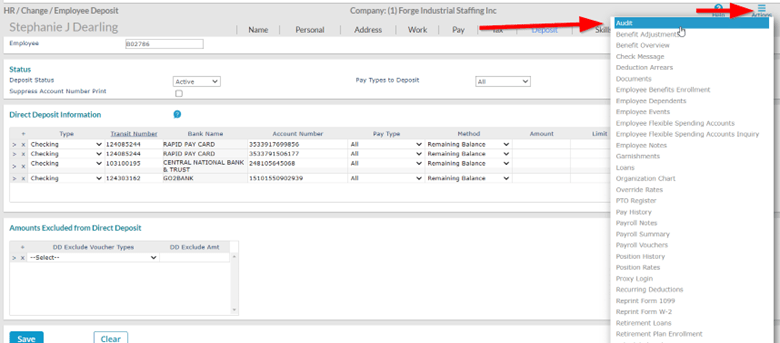
You can sort by clicking Field name at the top and you are looking for the Rpt info. Those are changes made to direct deposit area.

How do I reset a user password in Prism?
Go to Prism and follow below steps.
Search an employee by last four of social or full name:

Resetting a login password:
Actions > User Record > Change password and hit save
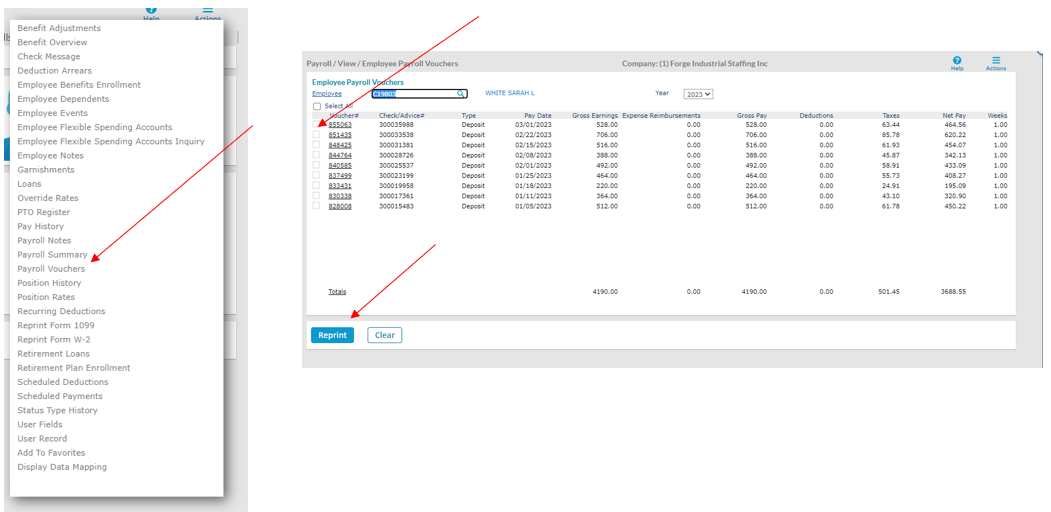
How to view/print SA paycheck stubs?
Go to Prism and follow below steps
Search an employee by last four of social or full name:

Actions > Payroll Vouchers > Select Voucher needed > Select Print
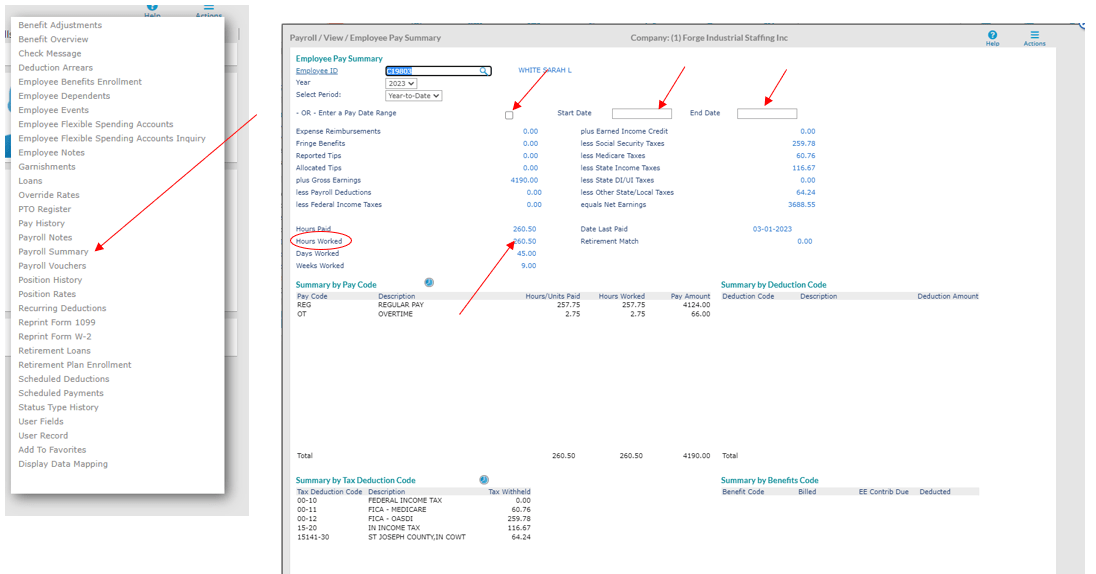
How to view employees client/vacation time/paid holidays?
You can view in employee profile as shown below.
Search an employee by last four of social or full name:

Actions > Payroll Summary > Check “Enter a pay date range” box > Enter Start & End Date > Hours will calculate
Q: How do I enter a health insurance refund?
A: Please follow below steps.
Refund in Prism
While in the employees file in Prism, go click on Action at the top right of the page.

A drop-down menu will pop up, select Scheduled Payment
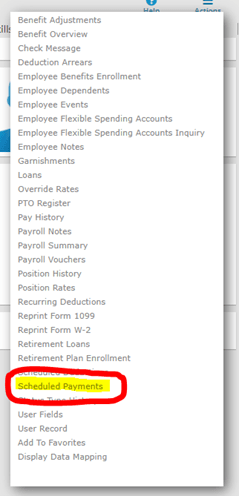
Once in scheduled payments, it should look like the image below.
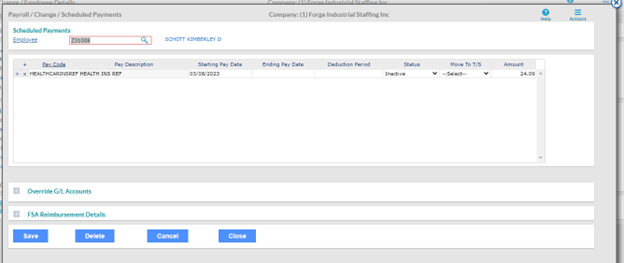
Click on Pay Code.

Select HEALTHCARE INS. REFUND.

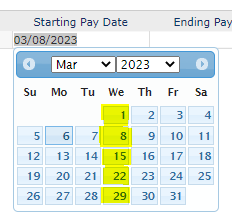
Enter Starting Pay Date. The starting date should the date of the next pay day.
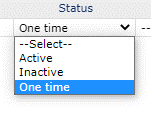
The status should be One time.
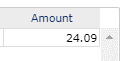
Enter the Amount of the refund.
Save.
A: Yes, you can and here is how you do it.
1. From the Bullhorn Menu go to Goals & Quotas

2. Click “+ Goal”

3. Select what time frame you want to use along with what activity you want to track.

4. Type in who you want to track

5. Continue to type users and input goals and then click save

6. The goals and the status of those goals will now be displayed.

Q: “I keep getting confused between placements, jobs, and candidates in Bullhorn”
A: Don’t get down on yourself! This is a very common concern and is easily solved by switching the UI from “modern” to “classic” view. You can do this by clicking on your username in the top right corner and clicking the slider switch so that it is gray and points towards the word “Classic”

This will cause the top bar of any specific record to reflect the type of record that it is. For instance, Candidates records will be green.
Modern View:![]()
Classic View:![]()
This makes it much easier to distinguish at a glance what kind of record you are working on.
Q: How do I search by specific criteria?
A: You can do this using the search bar located here.

Click on the search bar. Then select a combination of additional criteria to narrow down your search. You can set the rule to include/exclude the criteria. The Example below searches the Elkhart Branch for Active records and excludes anyone with the name Jake.

Some fields have additional, unique actions. Address, for example, lets you filter for a certain radius from that address.

While the “Find” button has its purposes, the “Search” function is a much more effective way of searching for specific records.
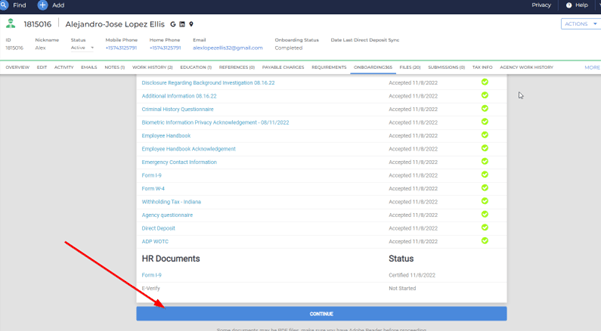
How Do I Complete E-Verify in Bullhorn?
Go to employee file. Click on Onboarding tab, then click on options> edit documents
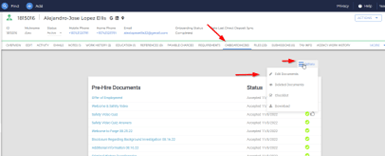
In edit documents, you can select filter>contains>everify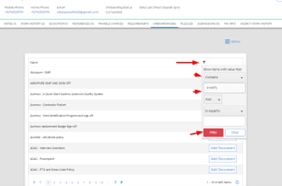
Once e-verify document populates, you will click add document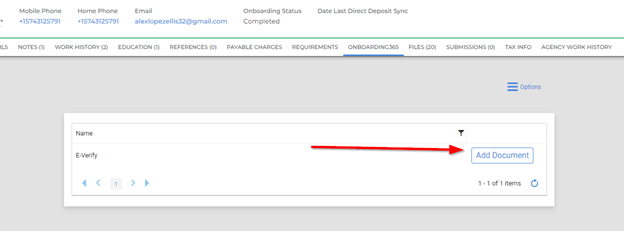
You will then click back in options to go back to your main document list.
When you make it to main list, scroll down and click continue.
Then Everify will pop up. You will click initiate verify and process steps.
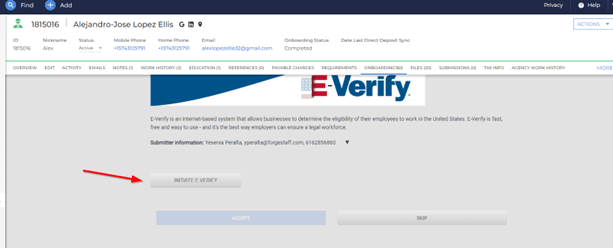
You do not need to print anything off as this will be tracked by Bullhorn
Once E-verify has been complete you MUST click ACCEPT

Then click Complete. If you do not click Complete the documents will not flow through the Files tab of the Candidate’s profile.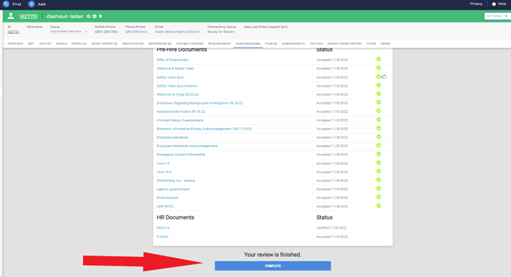
Bullhorn doesn’t have a native Dark Mode option, but you can get the same effect by changing a couple of settings in your desktop and web browser.
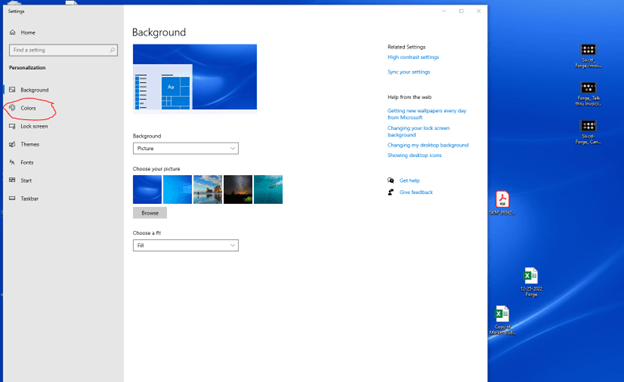
Right click anywhere on your desktop and select “Personalize”
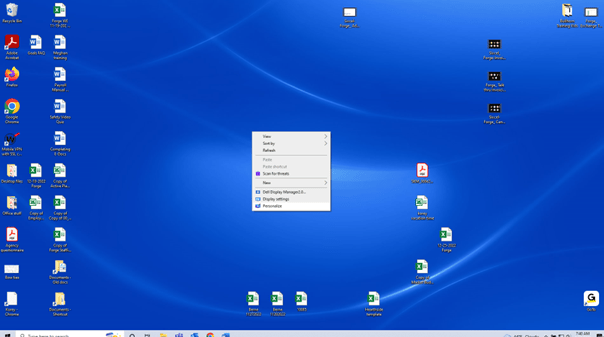
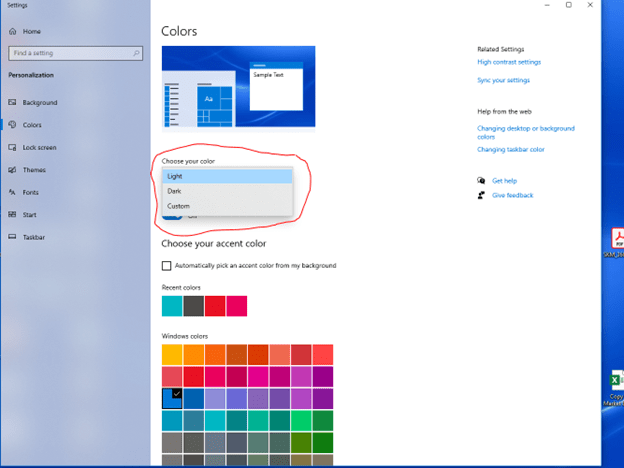
Select “Colors”
Click the Choose your color drop down and select “Dark” and then close the window
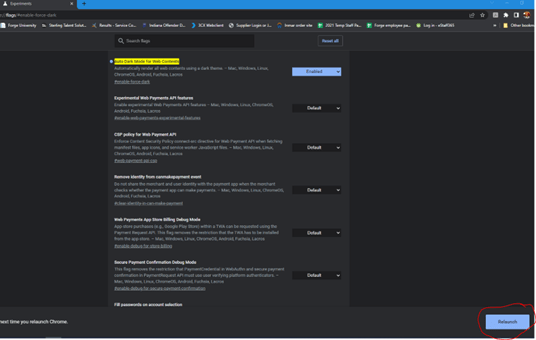
From Inside Chrome copy and paste the following into your address bar: chrome://flags/#enable-force-dark
Change the drop down for “Auto Dark Mode for Web Contents” from “Default” to “Enabled”

Then click “Relaunch” at the bottom right corner of the screen.
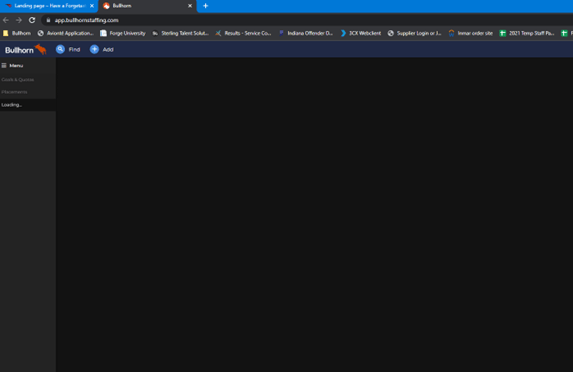
You now have dark mode in Bullhorn.
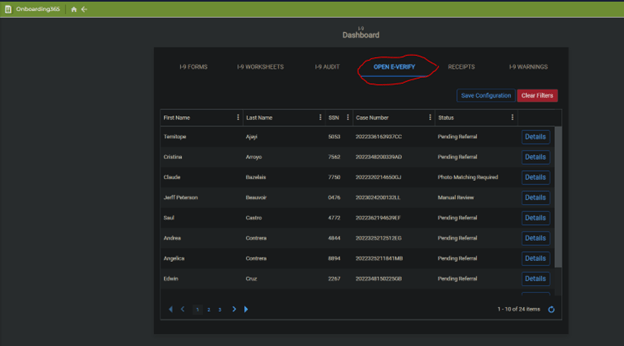
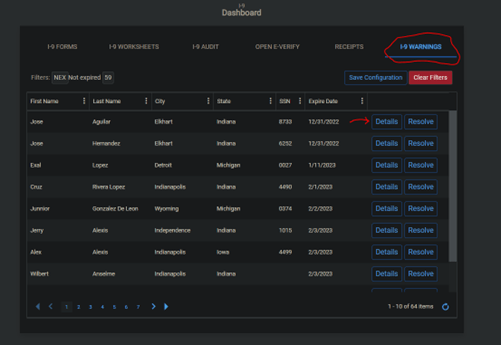
How to check I-9s, open E-verifys, and expired/expiring Work Authorization Documents:
Open Onboarding365 from the menu in Bullhorn

Go to I-9 Dashboard

Indiana Markets: Click “Open E-verify” and review open cases. Complete the needed steps to close the cases.
Next, select “I-9 Warnings” and review Service Associates’ records, adjusting their employment statuses and placing notes for anyone with an expired work authorization document. We should call these Associates and request that they bring in updated documentation for placement. If any Associate is actively placed with an expired work authorization document, the associate should be contacted immediately for the updated documentation.
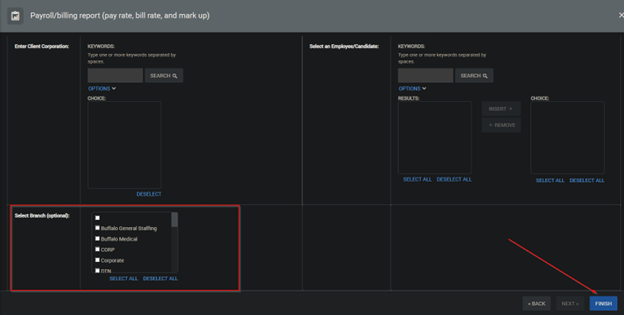
How to check all active I-9s for the first full week of billing:
Go to Canvas inside of Bullhorn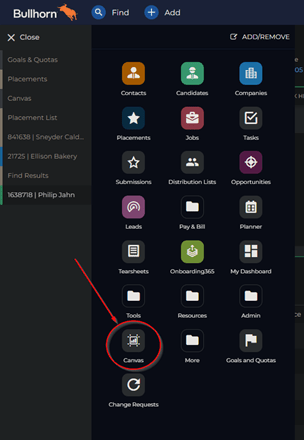
Select Run “Payroll/billing report (pay rate, bill rate, and mark up)”

Select the date range of the first full week, then click “Next” (if you click “Finish” the report will run for the entire company for the selected date range)
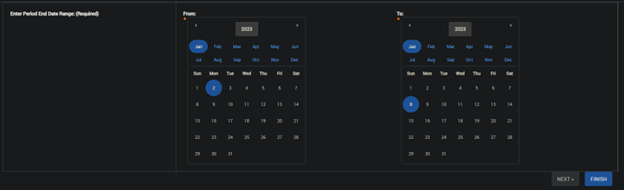
Scroll down and select your branch and then click “Finish”
Once the report is complete, click the download report button and download in 2007 Excel format.
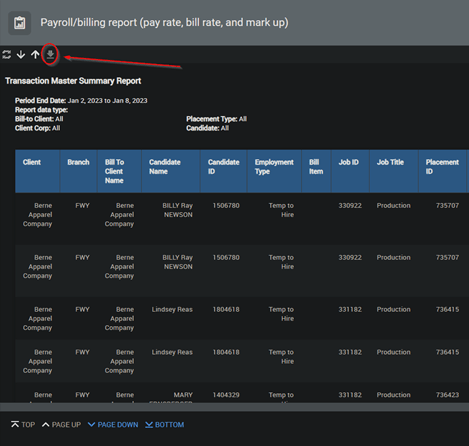
When prompted click the downloaded file to open it

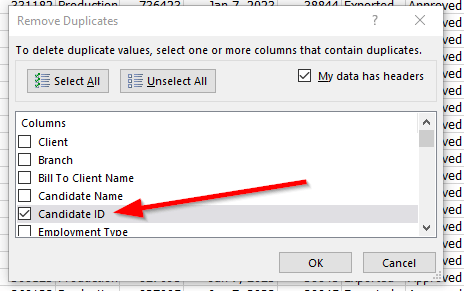
When the file opens, click the “Data” tab and select “Remove Duplicates”
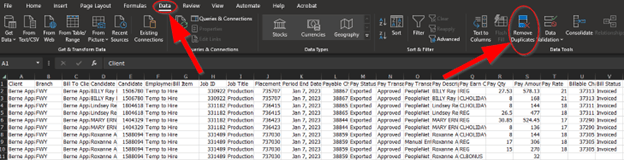
Unselect all columns except Candidate ID, then click OK
After Excel has removed the duplicates, only your unique values will remain. Column D (Candidate Name) contains the list of the employees that need to have their I-9s checked. Column E has their candidate IDs for easier access to the record. These are the only two columns that you need.
Inside of Bullhorn, type in the candidate ID to pull the candidate up.
Navigate to the candidate’s file tab and confirm that there is an I-9 present and compliant.
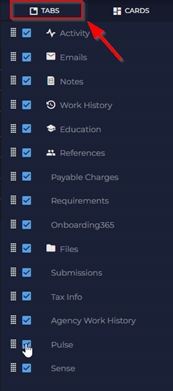
Customizing your Candidate record overview layout
Access Candidate and Adjust the Overview layout by clicking on the Layout Button

Unchecking any of the categories under tabs will remove that tab from the top of the candidate record (see below for before and after screenshots)
Before adjustments
![]()
After unchecking Education, References, and Pulse (you can customize this to what works best for you!)
![]()
Under Cards in the Layout Button you will find more options to check or uncheck depending on what works best for you. (see below for before and after screenshots of how this looks in the overview of the candidate)
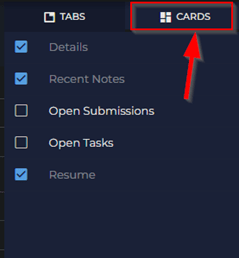
Before
After
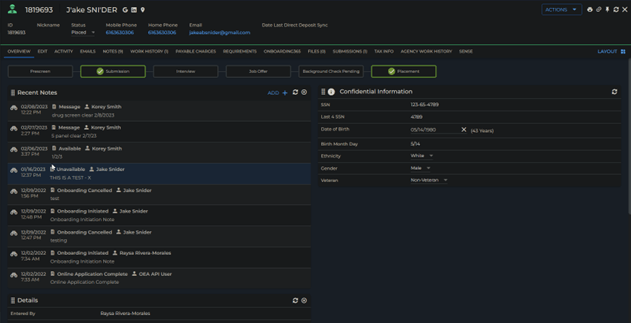
These Cards can be organized however you want them to be by clicking and dragging them to the desired location on your screen. In the below screenshot I moved the notes section to the top right-hand side of the candidate record.
**Please note that you can customize most card layouts in Bullhorn (Candidate, Company, Contacts, etc.)
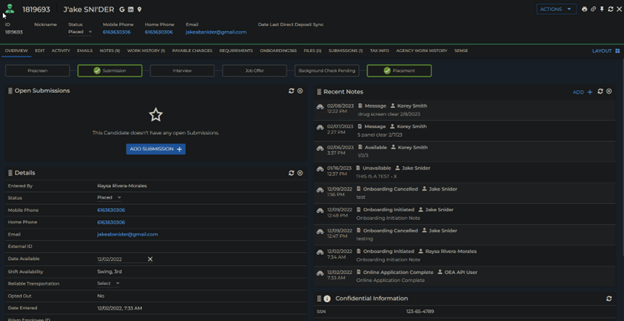
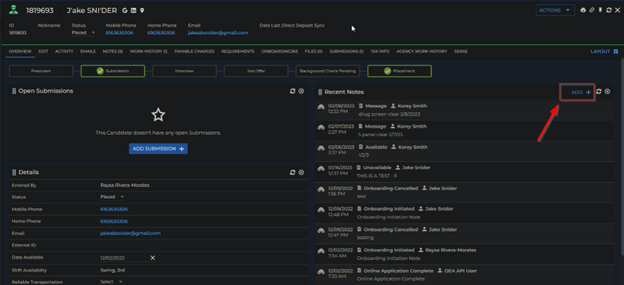
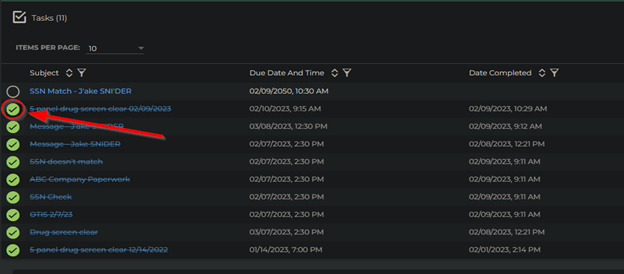
How To Add Notes and Tasks for SSN Verifications, Drug Screens, Background Checks, and Client Specific Paperwork to a Candidate Record
Access the candidate record and click Add under the Recent Notes card
Add a text into the Comments section of the Note. (SSN Match 02/09/2023 for this example)
**The type of Drug Screen (4-panel, 5-panel, etc.) and Background Check (IDOC, OTIS, National, etc.) MUST be specified in the Comments along with the results
Select an Action (SSN Match for this example).
Select Task as the Schedule Next Action.
Then click SAVE
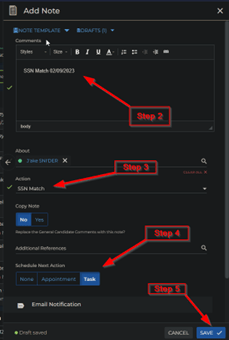
**DO NOT SELECT “YES” to Copy Note, leave as “NO”
The Add Task window will now open. The subject will automatically populate, and your Comments from the Note will also populate.
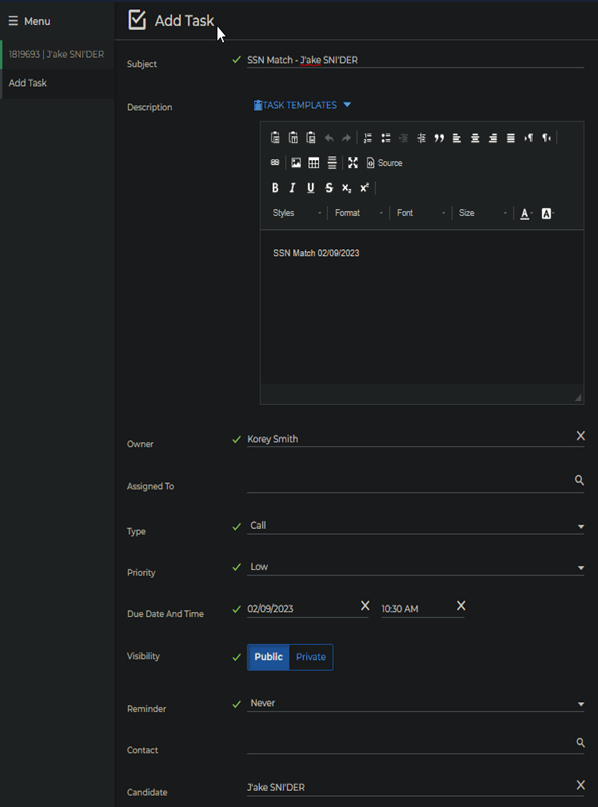
Select a Type (for this example SSN Match)
Change Due Date (for this example as there is no expiration date to 02/09/2050)
** DUE DATES for SSN verifications and Client Specific Paperwork has no expiration date.
** DUE DATE for Drug Screens should be set 30 calendar days out from when the drug screen was completed. The task will automatically close itself on that date and time.
** Due DATE for Background Checks should be set 6 months out from when the check was completed. The task will automatically close itself on that data and time.
Click Save
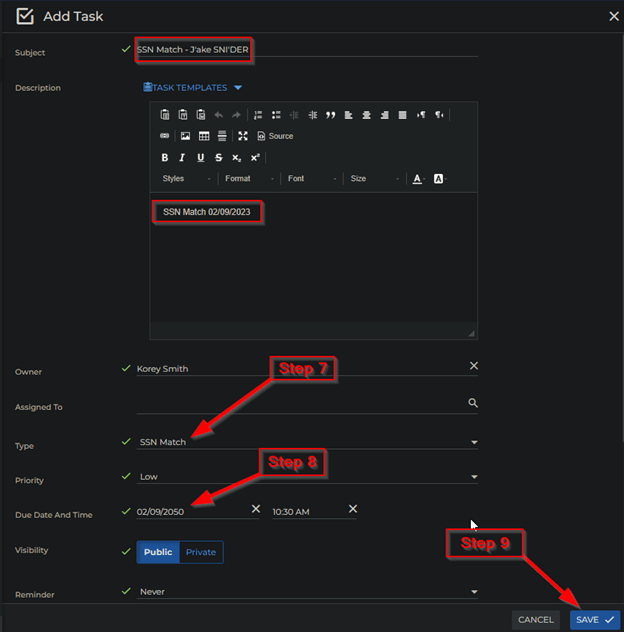
**LEAVE Visibility as PUBLIC otherwise your co-workers will not be able to see the task.
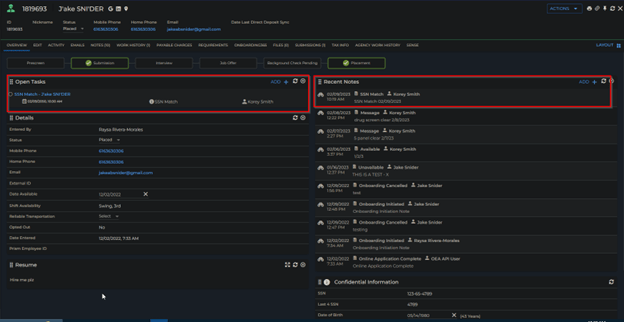
There are now matching entries in the Recent Notes and Open Tasks sections
If a file needs to be attached for SSN Verifications, Drug Screens, Background Checks, and Client Specific Paperwork upload the file to the Candidate’s files tab. Please ensure that you select the proper file type for the document that you are uploading.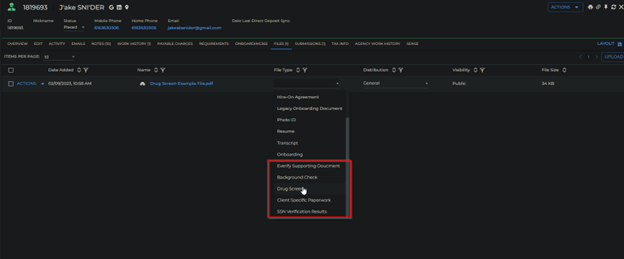
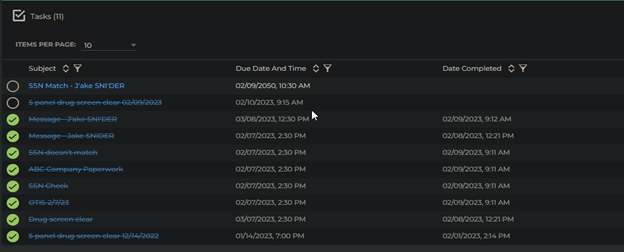
A few notes on Open Tasks:
Service Coordinators are unable to mark tasks as completed that were entered by others.
If a task is marked as completed mistakenly, the creator of the task or Branch Manager can reopen the task by going to the Activity Tab in the Candidate record.
Then Tasks

Then un-check the circle next to the task that needs to be re-opened
Before

After
This one is simple to fix but can be a bit confusing to wrap one’s head around. In an effort to simplify this guide, the SA who has the jammed placement will be referred to as the RIGHT person/record and the record that is causing the sync error will be referred to as the WRONG person/record.
Start by finding the Bullhorn ID number (BHID#) for the RIGHT candidate on the placement you are trying to sync.
Take the BHID# of the RIGHT person with the jammed placement and punch into the search bar in Prism. This will return a record for the WRONG person:
Then grab the email address off of the WRONG PERSON:
…and then punch that email into BH to find the Bullhorn record for the WRONG PERSON.
Then grab the BH ID# for that WRONG record, go back to the WRONG record in Prism, and enter the BHID# into the Employee Number field under the Work tab. Save your changes.
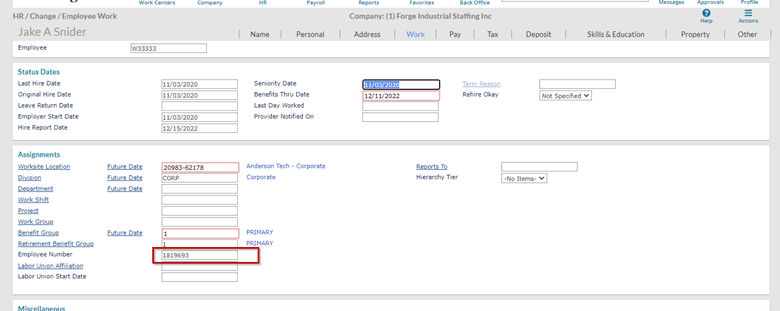
Because the ID# for the RIGHT person is no longer claimed by the WRONG person, you can now set the placement that was jammed into “ready to sync” and it should go through no problem.
It’s worth noting that NONE of the changes in Prism are made on the record that belongs to the RIGHT person. All edits will be made to the WRONG record and should only require the correction of the employee number to resolve the issue.
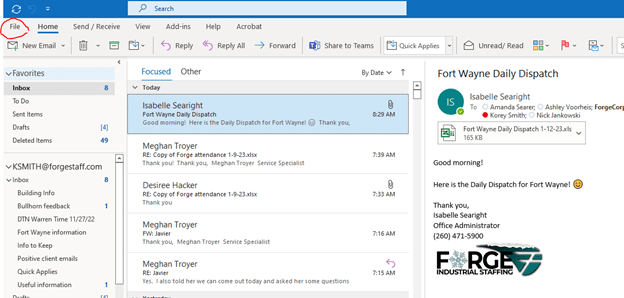
From Outlook, click “File” in the top left corner of the screen
Click “Office Account” from the file menu (bottom left corner)
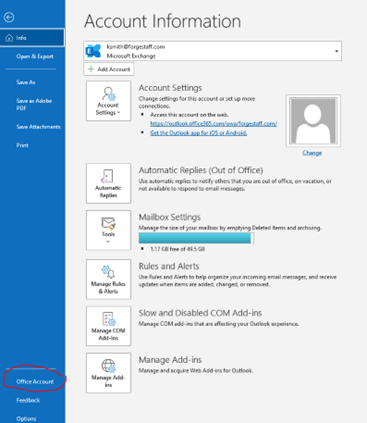
Change “Office Theme” from Colorful to Black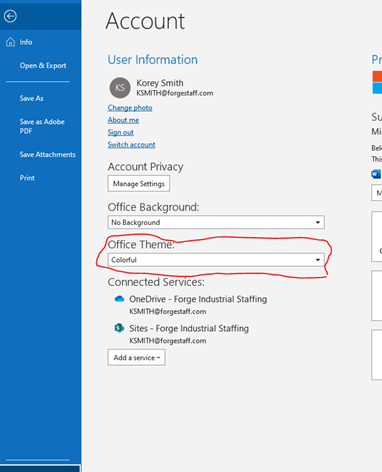
You now have dark mode in Microsoft Outlook!
In your Chrome window, to the right of the URL/Search bar, there is a small jigsaw puzzle piece:
(If you do not see the puzzle piece, then you do not have any extensions running and are already finished with this task. Kudos!)

Click on that icon and it should take you to the Extensions page with little toggle buttons where you can turn the extensions on or off.
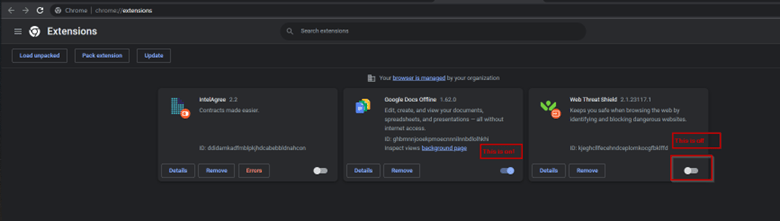
Change your extensions to off.
If this does not resolve your issue, please submit a support ticket!
If your applicant is reporting that they see the name of another Staffing Agency on their onboarding page like this:

You can instruct your applicant to log into this page with their estaff credentials. The same email and username they would use to log into our onboarding site.
The applicant should now be on the Home page. Please ask the them to click the top right corner of their screen for the three horizontal lines (or hamburger) and select “Change Agency” as pictured below.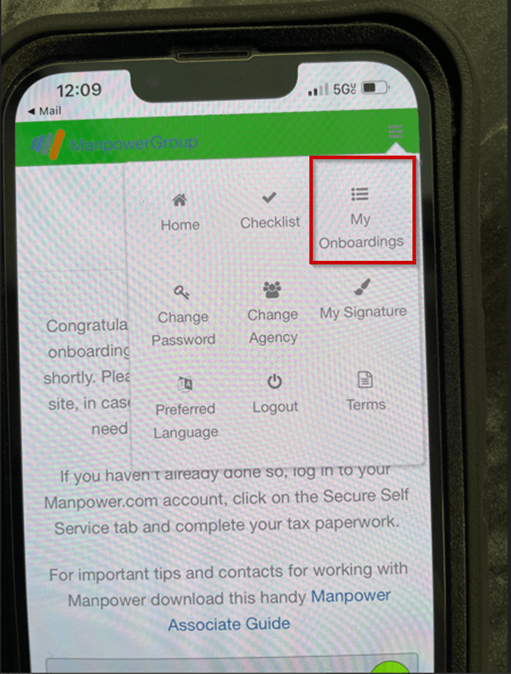
The applicant should now click the top right corner as pictured above and select “Change Agency”, which should result in a drop-down appearing that looks like this:
Please instruct your applicant to select Forge Industrial Staffing from the drop-down list.
The Applicant should now be logged into the correct instance of Onboarding, and can proceed with their document submittal.
On Desktop
If the SA has not completed the document packet yet, they will be able to simply click “Options” in the top right of their screen on desktop

Then click options again and select “Checklist”
Then click “Reopen Profile”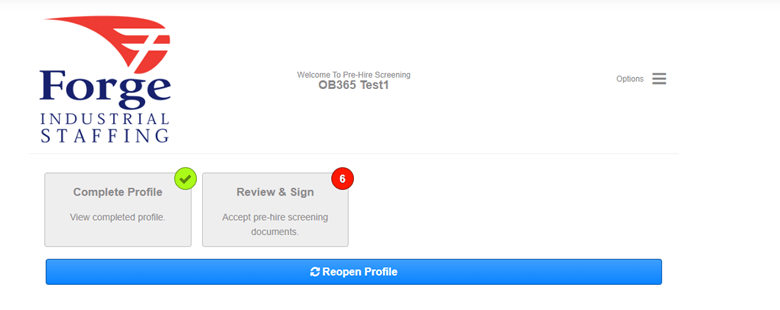
IF THE SA HAS ALREADY COMPLETED THEIR DOCUMENT PACKET!
If the document packet has been completed, the blue Reopen Profile button will not be available for the SA.
The coordinator will have to go to into the OB365 tab for the candidate and click Options and Edit

This brings you to a list of documents in the packet: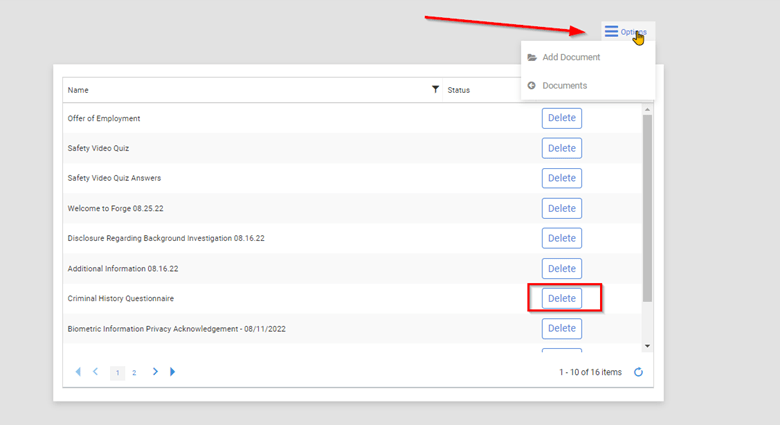
If you delete a form and then add it again using the buttons detailed above, the SA will then be able to see the blue “Reopen Profile” button on their end as described in the previous method. The SA will be directed to the form that was deleted first, which should alert them that the info was incorrect on that document.
Regardless of which method is used, they will be asked to edit the initial info used for autofill, and then will have to quickly go through and confirm each form they have done already. They will *not* have to refill any of those forms, unless the edit they made to the pre-hire info would affect that specific form.
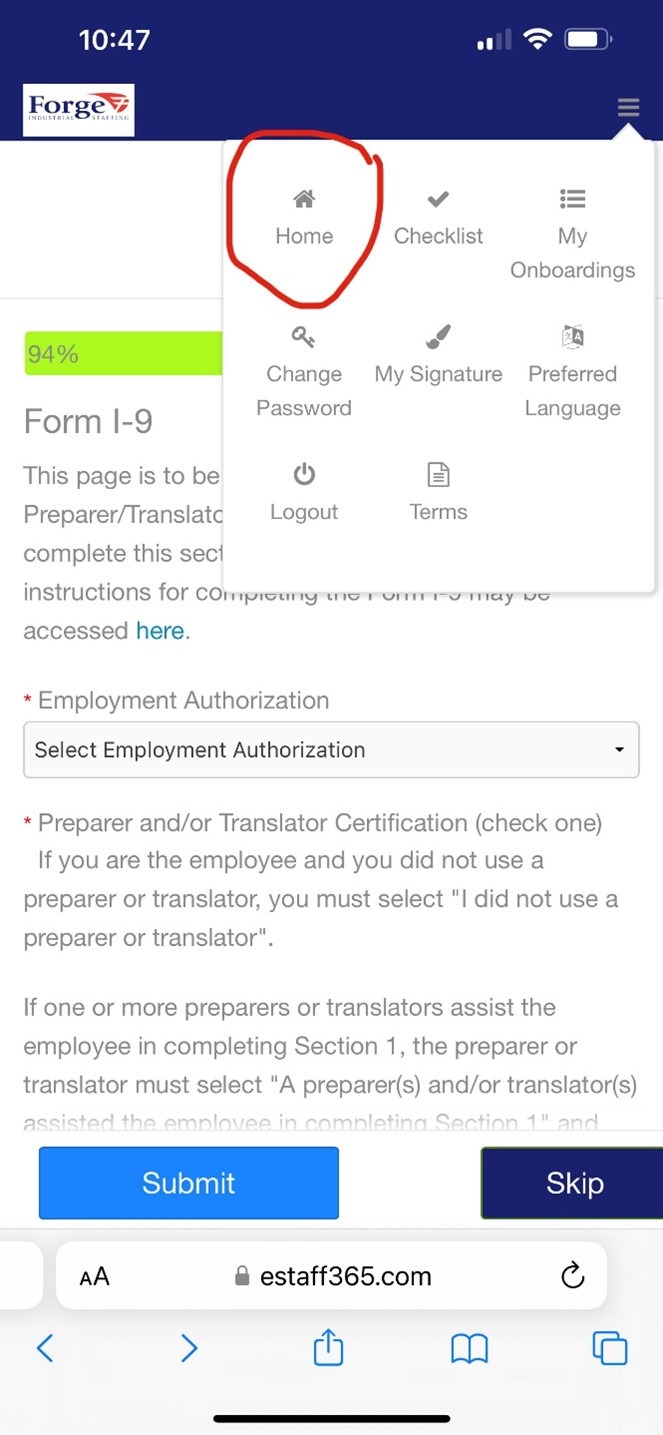
FOR MOBILE:
If the SA is on a mobile device, the steps are similar and detailed below.
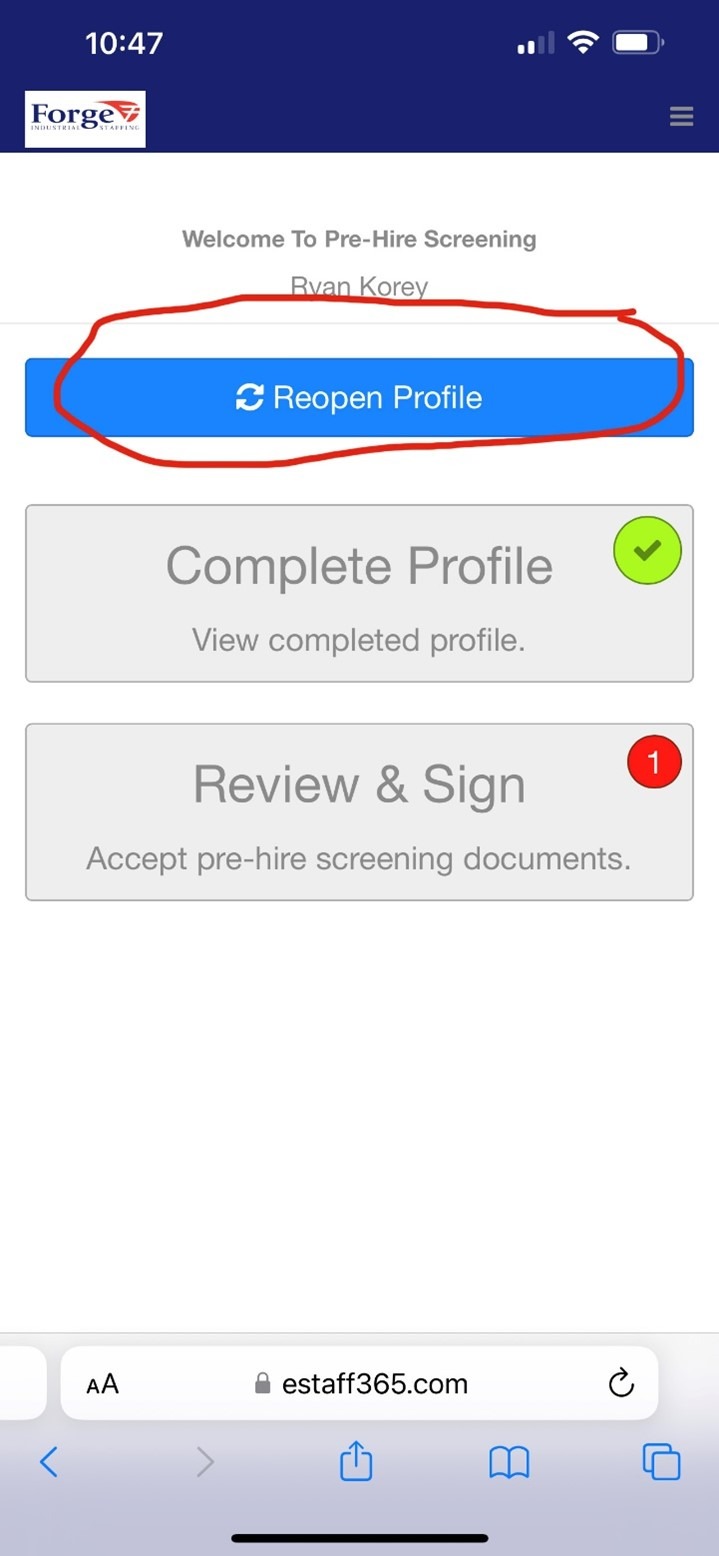
To get to the “Reopen Profile” button on mobile. Click the options in the top right corner and select “Home”
The Reopen Profile button should be displayed on their home screen:
How can I tell if an applicant’s email address is real?
You can check to see if an email address is real and valid using any number of email validation services.
I recommend Email Checker – Verify Email Address Online (email-checker.net)
It is very straightforward to use. You just enter the email address in the text field and hit “Check”.
The results will come back as either “OK”
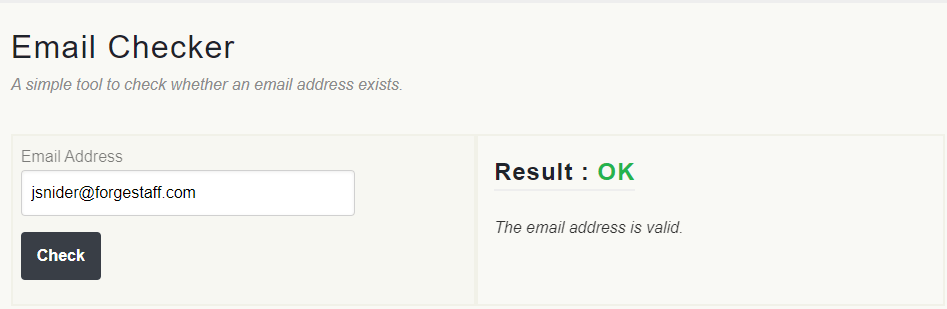
or “Bad”

It is also possible for an address to come back as “Unknown”, but that is less common.
This can be a useful tool when trying to determine why an applicant isn’t receiving emails.
General Rundown of OB365 Dashboard Functions
“I received an Onboarding Error. How can I check to see if the packet was sent?”
There are times that the communication between OB365 and Bullhorn breaks down or you need to check the specific details of an onboarding packet and can’t get to it from the OB365 tab of a candidate record. The OB365 Dashboard is a very useful tool in this and other situations. Here’s how to get to it!
From your Bullhorn Menu:
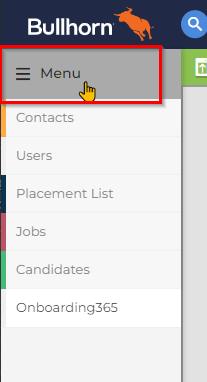
Then just click on the OB365 Button here!

The area inside of the OB365 Dashboard that you will likely use to troubleshoot problems is “Candidate Onboarding”
 Once you are in the Candidate Onboarding section. You can click on the options button in the right-hand corner to search for a specific onboarding packet.
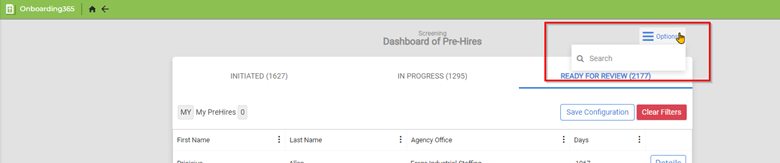
After searching for your specific candidate by their last name, you’ll be presented with each of the document packets they have been sent. Don’t worry too much about duplicates in this list, as these are not profiles, but “packets” of documents. I think of them as big manilla envelopes full of forms… Mailing more than one doesn’t cause too much trouble.
You can see from the picture above that onboarding packets are categorized by “Status”. There will be times when you try to onboard someone, and you get an error that will indicate the packet was not sent. Usually in these cases, you can come into the OB365 dashboard and confirm that the packet was indeed sent.
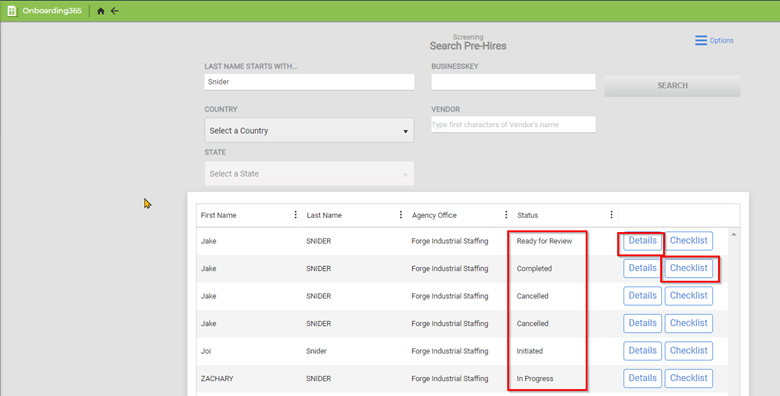
If you want to learn more about where the onboarding packet was sent, or what Bullhorn account it is tied to. You can look at the “Details” page.
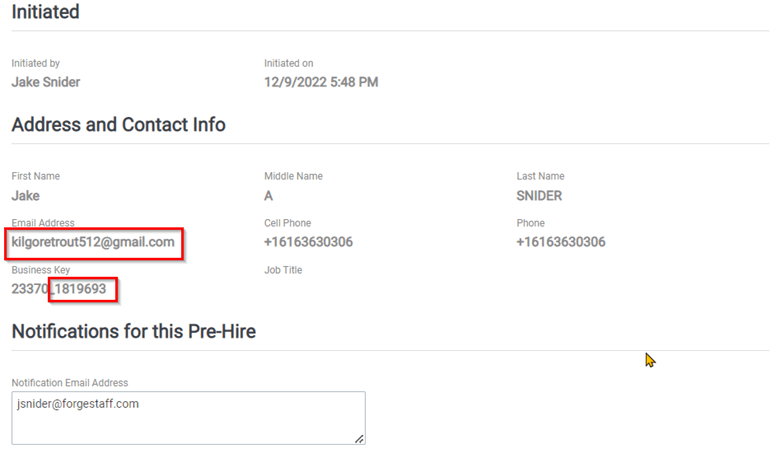
The Email address that the packet was sent to will be listed here, and the second part of the “Business Key” should match the Bullhorn ID# of the candidate you are onboarding.
The button next to “Details” is the “Checklist”. If you are trying to certify an I-9 or want to check on the progress of an Onboarding Packet, this is the place you want to be.
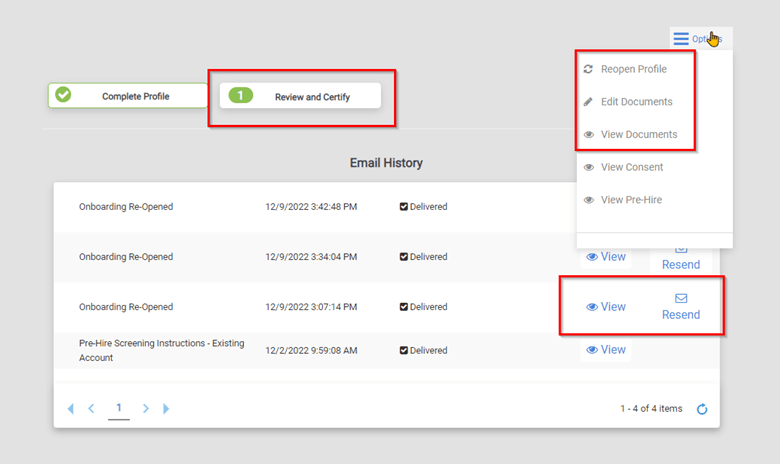
Inside the Checklist, you will be able to review and certify documents for a packet that is in the “Ready for Review” status.
You can also see the history of emails related to this packet, view them, and resend them if necessary.
The “Options” button on this page lets you re-open a profile that was cancelled in error (keep in mind this will send it to the same email address that is was created for, and is not a solution for an onboarding sent to the wrong address).
It also lets you Edit/View documents in the packet.
When you click on “Edit” you will be brought to a screen that looks like this:
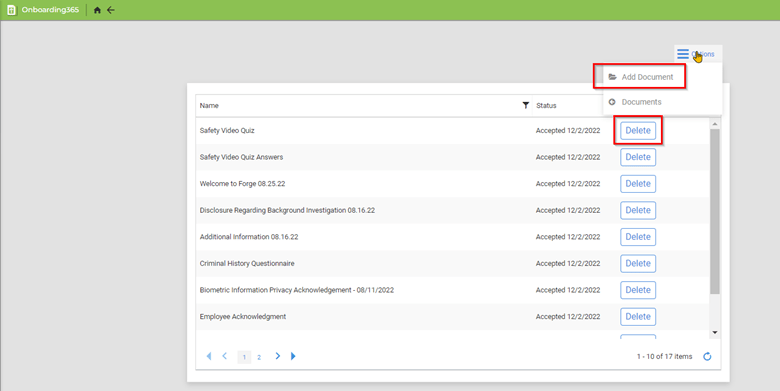
You can see each document in the packet here. You can also delete a particular document or add a new copy of a document from this area. KEEP IN MIND: Because I-9s are auto filled with information from the initial application, deleting an I-9 and then re-adding it will not help you to correct an inaccurate I-9.
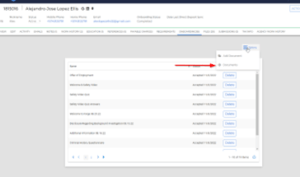
If you click on “View Documents” instead, you will be presented with the screen here:
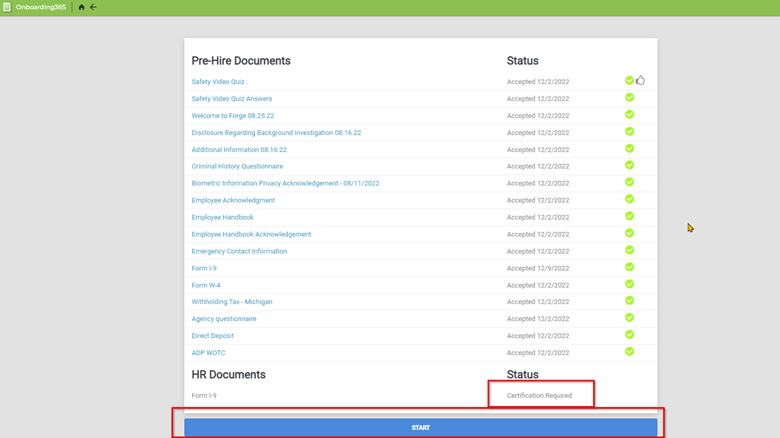
You will be able to see the status of each document and whether or not it is ready for certification. The blue “Start” button will start the process of certification.